SIGN UP

SUBSCRIPTION

TRANSLATE FILES

TRANSLATE TEXT

Glossary

Sign Up

Go to the sign up page

A. Click the ‘Create
account’ link on the Sign in page.
B. Or visit our Sign up page.

Enter user information

A. Fill in the requested
information and review the Terms of Use and Privacy Policy.

B. Click ‘Create account’.

Check verification number

A. Check your email inbox. A verification number is sent to the email address you provided.

B. If you enter an incorrect number, please click ‘Resend verification number’ button.

Check email inbox

A. Check your spam folder if you did not receive the verification link email.

SUBSCRIPTION

Choose subscription plan

A. Go to the Plan and pricing page.
B. Choose a plan you want to subscribe.

C. After checking the total price on the right side, click ‘Add payment method’ button.

Redeem a coupon

A. Click the “Enter code” button.
B. Enter the coupon code you received in an email or ad.
C. Click the ‘Apply’ button to redeem your coupon.
D. Payment method registration is required to redeem coupons. Please click the ‘Add payment method’ button.

Register payment information

A. Enter card information to be used for payment through Stripe.

B. Click ‘Save card’ button.

Complete payment

A. Subscription payment has been completed. Click the button to start using machine translation.

Upgrade plan

A. Click ‘Plans and pricing’ button at the top of the page and choose a new plan.
B. Please check the difference required for the upgrade on the right screen and click ‘Upgrade’ button.

Downgrade plan

A. Click ‘Plans and pricing’ button at the top of the page and choose a new plan.
B. Please check the difference required for the downgrade on the right screen and click ‘Change’ button.

TRANSLATE FILES

Go to the file translation page

A. Once you sign in, the translation page will appear.

Select source language

A. Select the source language of the file to be translated.

Select target language

A. After you select the source language of the file to be translated, select the target language for the translation.

Select translation engine

A. After you select the target language, select the machine translation engine.
B. Select ‘Legal’ if you want to translate legal documents such as contracts, judgments, etc.
C. Select ‘Patent’ if you want to translate patent claims or descriptions.

D. Select ‘Business’ if you want to translate common business documents.

Upload a file to translate

A. Click ‘Select from your computer’ button.
B. Select the .pdf file or .docx file you want to translate.
C. You can upload a file to be translated by dragging and dropping it.

Translate a file

A. Make sure that translation engine is selected correctly and click ‘Translate to {target language}’ button.
B. When the translation request is complete, it will look like the second screen below.

Download the translated file

A. Click the ‘cloud icon’ in the queue component to download the translation results.

TRANSLATE TEXT

Go to the text translation page

A. Once you sign in, the translation page will appear. Click ‘Translate Text’ button.

Select source language

A. Select the source language of the text to be translated.

Select target language

A. After you select the source language of the text to be translated, select the target language for the translation.

Select translation engine

A. Make sure that translation engine is selected correctly and click ‘Translate to {target language}’ button.
B. Select ‘Legal’ if you want to translate text in legal documents such as contracts, judgments, etc.
C. Select ‘Patent’ if you want to translate text in patent claims or descriptions.
D. Select ‘Business’ if you want to translate text in common business documents.

Translate text

A. Make sure that translation engine is selected correctly and click ‘Translate to {target language}’ button.

Glossary

Create glossary

A. Click the ‘Glossary’ dropdown in the top right corner of the translator.
B. You can upload a .csv file to create a glossary.
C. You can create a glossary by manually entering.

Create a glossary by uploading a .csv file

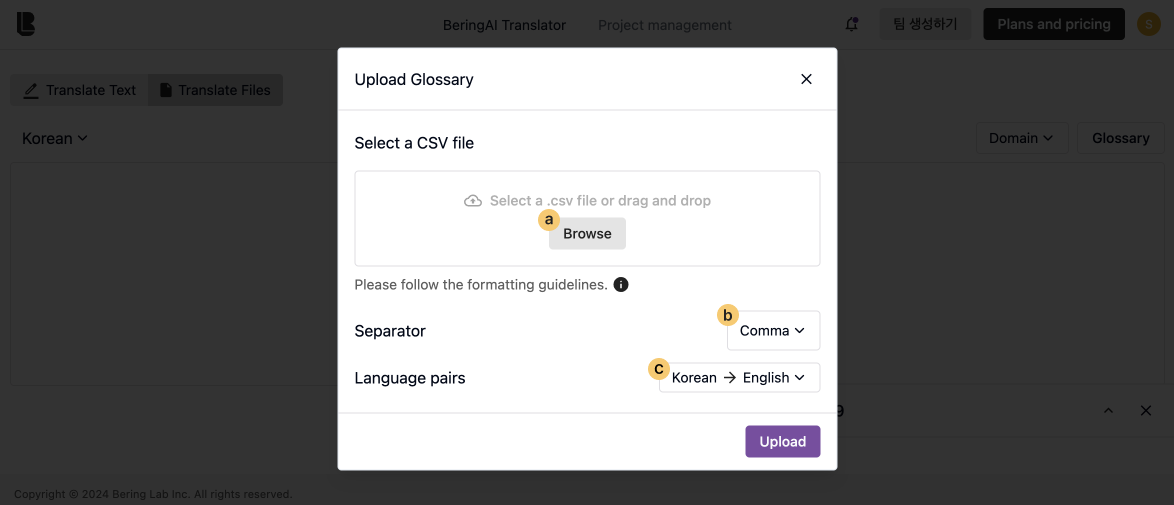
A. Browse or drag and drop your .csv file.
Only one language pair per file(e.g., English to Korean). The first row of the CSV file should start with the first entry(e.g., Artist;예술가). No comments are allowed in the file. Max. 5,000 entries
B. Please select the separator used in your .csv: comma, semicolon, or tab.
C. Select a language pair for your glossary.
D. Click ‘Upload’ button.

Create a glossary by manually entering

A. Please enter a name for your glossary, you can’t use a name that’s already been used.
B. Select a language pair for your glossary.
C. Click ‘Create glossary’ button.
D. To add entries to the glossary, check out the ‘Add entries to the glossary’ guide below.

Add entries to the glossary

A. Enter the source text.
If you enter source text in a language that does not match the selected language pair, the glossary may not be applied correctly.
B. Enter the target text.
If you enter target text in a language that does not match the selected language pair, the glossary may not be applied correctly.
C. Click the ‘+’ button to add an entry.
If the source text you entered already exists in that glossary, it will modify the existing entry rather than adding a new one.

Edit or delete entries to the glossary

A. Click the ‘Pencil’ icon and the input box will automatically fill in the selected source text and target text.
B. You can delete an entry by clicking the ‘trash can’ icon.
C. As mentioned in section A, clicking the pencil icon will populate the input box with the selected source text.
D~E. You can edit the entry by changing only the target text and clicking the ‘+’ button.

Use glossaries for machine translation

A. You can select a saved glossary by clicking the ‘Glossary’ dropdown in the top right corner of the translator screen.
B. You can manage your saved glossaries by clicking the ‘Manage glossaries’ button.